Sign up for FREE daily Updates.

How to Uninstall Android Applications in Bulk | Remove Android Applications in Bulk | Easy Uninstaller

Leave a Comment Follow me on twitter
Trying out new apps is a lot of fun..
Uninstalling apps, when you're running low on space, is a horribly tedious affair..
Easy Uninstaller brings bulk application removal to Android phones.

It's a huge pain to install an application and then get an alert that you're low on disk space. Android, natively, doesn't include any easy way to nuke a bunch of apps at one time.
Easy Uninstaller fills that void by bringing simple bulk removal to the Android platform. 

Fire up the app, star the items you want to remove, and then batch uninstall them. You can press and hold on individual entries to add them to an exclusion list, protecting them from future errant tapping. Not only does the exclude list prevent you from accidentally deleting apps you want to keep it also provides you with a ripe kill list—exclude your core and favorite applications and rest easy knowing that Apps Uninstall will only allow you to uninstall apps you're not attached to.
Easy Uninstaller is freeware and works wherever Android does..


How to Use:

1. First of all go to the Google Play store and install the Easy Uninstaller Free app.

2. Now run the app, here you can search and sort the app by keywords and names.Type the name of the app in the search box to uninstall the app.

3. Also gives you the option to sort all you Android Apps by name, size and date on install. With this method you can search all your app easily in the mobile.

4. After this you can select multiple apps from the list to uninstall them easily. Select multiple apps that you want to uninstall, and click “Uninstall Selected Apps” button to uninstall them.


Download Easy Uninstaller:

Google play Link
Mediafire Link

That's All.!!
Enjoy..:)
◄◄READ MORE►►

How To download Torrent in Android Mobile Phones | tTorrent Lite

Leave a Comment Follow me on twitter

                               
All of us use Torrent to download the files from the internet. Torrent is the best way to download any files. Now these days everyone has a Smartphone and we all know that how important is the smart phone and how important is it. At this time Android is the most popular OS in the market. So it is really essential to know in and out of your Android devices. Today I will be giving you a

mobile trick on “how to download a torrent file on Android mobile or tablet using best Android torrent client”. So without wasting much time I will explain you a simple and smart way to do this android mobile.

So lets start with this tutorial on android mobile trick. After performing these steps of this mobile trick you are able to download a torrent file on your Android device. There are two type of Android torrent apps are available, one is free application and other is paid one. It’s quite obvious that we all are interested in free Android torrent downloader rather than the paid one, right? so I will be covering Free through which this can be done.

1). First and for most you need to have "tTorrent Lite" app installed in your phone.

2). Once you have downloaded tTorrent Lite and installed it in your android mobile or tablet you need to download required torrent file, its obvious that without torrent file what will you download so do that first and save to your SD card or Phone memory.

3). Now open the app and browse the torrent file which you have download it.

4). Once the file is added click on the Download button and download will be start.

5). If you’re using Wi-Fi than you can also turn it on/off as per your requirements.

6). And you can also increase or decrease the download and upload speed.

That’s it now you will be easily able to download this app on your android device.

Download tTorrent Lite:

That's All.!!
Enjoy..:)
◄◄READ MORE►►

How To Create One Click Shutdown and Restart Shortcuts

Leave a Comment Follow me on twitter

Shutting down a personal computer does not involve any tedious process though, but the entire process can be reduced to a simple One Click Shutdown & Restart.This gives you a quicker way to shutdown windows without navigating through the start menu, or using a third party shutdown utility. You can also do much more with a shutdown shortcut than merely shutting down a personal computer. Adding combination of several switches can do extra duties for you with shutdown shortcut.

First,
Right Click on desktop and choose New, and then Click on Shortcut.
The create shortcut wizard appears. Type Shutdown into the box as the location, afterward click on next. Type any name for the shortcut (in my case I typed Turn Off Computer) and click Finish.

Second,
what we have to do now is to add combination of switches for the shortcut to perform the action that we want. Right Click on the shortcut you just created and choose properties. Within the Target box you will find this command %windir%\system32\shutdown.exe. Place the cursor at the end of the command (i.e after the last e of the .exe) and press space. Add -S -f -t 00 to the command. You will have something similar to this %windir%\system32\shutdown.exe -S -f -t 00

Third, 
click on Change Icon button and pick an icon of your choice for the shortcut. Click on ok after everything and double click on the shortcut to shutdown you computer..

If your computer fail to shutdown, cross check your switches and make sure there are spaces between all the switches.

Finally, 
Drag the shortcut to your Quick launch Toolbar for One Click Shutdown.

Note:  
You can also give it a keyboard shortcut. By pressing key combination (eg CTRL + ALT + S) will perform the action.


Switches and Meaning:

You can use any combination of the following switches to make the shortcut to perform different actions..

-s
Shuts down the PC.

-l
Logs off the current user.

-t 00
Indicates the duration of delay, in seconds, before performing the action.

-c "message"
Displays the message in the System Shutdown window. A maximum of 127 characters can be used. The message must be enclosed in quotation marks.

-f
Forces any running applications to shut down.

-r
Reboots the PC.

-i
Display the shutdown interface (GUI). MUST be the first option!


Example:
The following command will reboot your PC after ten-seconds delay and display the message "Will Be Back Soon"
%windir%\system32\shutdown.exe -r -f -t 10 -c "Will Be Back Soon"


But you can do much more with a shutdown shortcut than merely shut down your PC. You can add any combination of several switches to do extra duty, like this:

shutdown -r -t 01 -c “Rebooting your PC”

Double-clicking on that shortcut will reboot your PC after a one-second delay and display the message “Rebooting your PC.” The shutdown command includes a variety of switches you can use to customize it. Table 1-3 lists all of them and describes their use.

I use this technique to create two shutdown shortcuts on my desktop—one for turning off my Windows, and one for rebooting. Here are the ones I use:

shutdown -s -t 03 -c “Bye Bye Aniket!”
shutdown -r -t 03 -c “Ill be back Aniket !”


Having any problem?
Feel free to ask here..

That's All.!!
Enjoy..:)
◄◄READ MORE►►

How To Hide Your Files using Simple Softwares

Leave a Comment Follow me on twitter

Here are a few simple software that allow the lay PC user to hide/protect files and folders for prying eyes.


Let’s be honest here, we all have something... or ‘other’ on our laptops and home PCs that we don’t really want anyone to see. We try to tuck them away into the ‘nether-est’ - for lack of a better term - regions of your computers software, away from the prying eyes of the folks at home or the girlfriend who as it turns out just might not be too happy with you having pictures of your exs. 
So what do you do? 
Hide the files of course. 
Of course there’s the traditional method of right clicking on the folder or files and selecting the Hide option and then choosing the ‘Do not show hidden files and folders’ option from the Tools, Folder Options menu. But of course this, in all probability, you already knew. But another simple technique is to create a Zip file or RAR file and password protect it.

But let’s stay clear of the conventional. So for those of you who aren’t hardcore software geniuses but are looking to keep things really simple yet secretive here are a few freeware apps you can use.


Hide Folders


One of the simplest software to use is the Hide Folders. It’s not rocket science really. The application is easy to use and involves nothing more than selecting folders you want hidden and that’s that. A password system allows you to make sure that no one can access the software itself to un-hide the folders you’ve selected. Each time you try to access the software, which could even be a shortcut on the desktop for the world to see, you’ll need to enter the password.

Download Hide Folders:
http://www.brothersoft.com/d.php?soft_id=209185&url=http%3A%2F%2Fwww.hidefolders.org%2Fdownload%2Fhidefolders-setup.exe


Iron Privacy Folder


It’s a small app that doesn’t take up too much place or RAM and is extremely simple to use. The only thing is that it’s a little too simple. What this software does is hide and sort of “deflect”, well re-direct is a more appropriate term, prying eyes to the Control Panel. This is only in case you’ve got your View Hidden Files and Folders option active on Windows. The only problem is the application doesn’t have a password protection option so anyone can access it if they know here the folder is and unlock it.

Download Iron Privacy Folder:
http://www.brothersoft.com/iron-privacy-folder-download-56257.html 


Folder Protector


It’s just another simple protections system for the paranoid or the secretive. It’s a lightweight program that is simple and easy to set up and use. It starts off with you of course having to assign a password for the software. This ensures that you and only you have access to the system. Once in you can simply select folders from your computers directory and hide them. Again it’s a simple trick. The folders may show up when you Hide and Unhide folders and files from the Windows settings but they won’t be accessible to anyone without going through the software via the password.

Download Folder Protector:

Encrypt Files


Although there are plenty of thoroughly computer literate and PC savvy individuals, like I said this is for those looking for simple solutions that are quick and easy to manage so although the name may suggest ‘Encryption’ which could make a lay person believe that it requires some skill for usage, this software is easy as pie. It allows users to put a security password on the application itself so no one can access and hide data on your PC from any drive. There are choices of encryption options for those who know what they’re doing but you can randomly select any for those who don’t. The software allows you to shred or delete the original files and keep the encrypted copies. The copies can also be hidden when encrypted and password protected. It allows for encryption of full directories but not entire drives.

Download Encrypt File:
http://www.encryptfiles.net/files/encrypt_files_setup.exe


There are others out there if you look hard enough of course, however don’t be surprised if most of the software you come across save these, would end up being Shareware that offer evaluation periods of 30 days and require registration (Credit Card or PayPal accounts required) later. Like I said before, sometimes it’s really simply and there are dreadfully easy ways to keep your data secure and then sometimes you need a little more of stringent policy to keep the nosy people out of your affairs.

For those who have other FREEWARE options they’d like to suggest please feel free to leave the names in comments section..!!

That's All.!!
Enjoy..:)
◄◄READ MORE►►

How To track your lost phone

Leave a Comment Follow me on twitter


It is unfortunate that wherever we turn, crime seems to be right next to us. Your phone is expensive. While very helpful, it is important to note that if a malicious person stole your phone, it is best to report the theft to the police. Attempting to reclaim your personal phone from a malicious party can put you in harm’s way.

Let the authorities handle your theft,If you lose your moblie..
1.Dial *#06# from your mobile.

2.Your mobile show a unique 15 digit IMEI number.

3.Note down these number any where but except your mobile as this is the number which will help trace your mobile in case of theft.

4.Once stolen you just have to mail this 15 digit IMEI number to cop@vsnl.net

5.No need to go to the police.

6.Your mobile will be traced within next 24 hours via a complex system of GPRS and INTERNET.

7.You will find where your hand set is being operated even in case your no is being changed.


SHARE THIS VERY IMP MESSAGE TO YOUR FRIENDS AND RELATIVES.


If you lost your mobile send an email to cop@vsnl.net with the followig info.


That's All.!!
Enjoy..:)


Your Name:
Address:
Phone model:
Make:
Last used number:
Your Email for contact:
Missed date:
IMEI Number:
Keep all this stored for emergency use.


Share to all your friends,Family members...


Thanks.! :)
◄◄READ MORE►►

How to Delete Facebook Account Permanently

Leave a Comment Follow me on twitter


Facebook allows you to temporarily deactivate your account which will hide all your information on Facebook from others that means no one will be able to access your information on Facebook. But this does not permanently delete your Facebook account, whenever you want, you can again re activate your account and you can see all your data as it was. But what if you want to delete your Facebook account permanently ? This article will guide you on how to permanently delete a Facebook account with some other tips that need to be taken care before and after deleting your Facebook account. 


How Can Permanently Delete Facebook Account ?

To Delete Facebook account permanently, First you should Delete everything which is related to your profile (example: Pictures, friends, Messages, Wall-Posts, news Feeds, mini-feeds, posted items, interests, groups, fan pages, applications, etc.) but before deleting Download the All information from your Facebook account.


Before you delete your account permanently be sure that’s what you want to do, because once you delete it you won’t be able to retrieve it.

If you are sure that you will never use that account again then go ahead and permanently delete your account. Once you delete it, you’ll not be able to reactivate your account or retrieve any of the content or or information you have added.


1> Go to http://www.facebook.com/help/contact.php?show_form=delete_account ,

2> Click on SUBMIT only if you are sure you want to delete the account.

3> Once you click on Submit, you’ll be taken to a page, where upon clicking OKAY your account will be permanently deleted forever.


You’ll be given a chance to reactivate it by logging into your account within next 14 days after deleting the account. Once you login you’ll be given the option to cancel your request. You can rethink about your decision.!!


That's All.!!
Enjoy..:)
◄◄READ MORE►►

How To Download all your Facebook Information in Easy Way

Leave a Comment Follow me on twitter

We Love to Upload Photos and Videos in Facebook to share to our friends and all over the world. Is this possible If you want to download those files which you have uploaded in Facebook?, Yes you can. Facebook have download option for downloading your all contents from facebook. This options used to recover lost files in local hard drive or When going to close the Facebook account, you can take all your content to your local hard drive.

This tool lets you download a copy of your information, including your photos and videos, posts on your wall, all of your messages, your friend list and other content you have shared on your profile. Within this zip file.

Lets See How to Do it in Easy and Simple Way:

Just Login Your Facebook Account and Go to Accounts and Click Accounts Settings.

Then in Settings Tab you can see Download Your Information in that Click Learn More, as shown in below screen shot.


And You will be taken to Download page, Read the Instructions and Click download, as shown in below picture.


Then Facebook will Notify and do security Check, Then you can Click Download to request for downloading the information of facebook account. Example see Below


Thats it, Facebook will start to generate all your information to download process. It ill notify with one message like


Above picture, So After the Request Facebook will send you the Download link to you email. So you can Download all your facebook information in Zip Format.

I hope you enjoyed this post, If so Share this on Facebook and Twitter.

That's All.!!
Enjoy..:)
◄◄READ MORE►►

How to Query Google Results Via Sms

Leave a Comment Follow me on twitter

How to Query Google Results Via Sms
SMS’s are one of the most preferred mode of communication among people.Usually people believe that Internet is the only way to get google results.Recently Google has launched a new service that gives you  access to Movie show times ,Locations of local businesses ,Word meanings ,weather forecast ,Product prices and much more.
So, if you don’t have a data plan (although they are cheap these days) you can still get answers for your queries by Google.At present this service is only available in India and USA.
India users can send their queries at  : 9773300000
USA users can send their queries at : 466453

Here are few Sample Queries

To Get the Meaning of a Word:

Define Apple

T0 Get Sports News

Score red sox

To Get Movies Shows

Movies new york

To Get Stock Updates

Stock tgt

To Get Web Snippets

Web hubble

To Get Cricket Scores

Cric
 All networks are supported by Google Query SMS service.
Note:-This service is free from Google but message & data rates may apply.
◄◄READ MORE►►

How To Open Multiple File Formats (75+) With Single Software

Leave a Comment Follow me on twitter

Open Multiple File Formats (75+) With Single Software
Is your Computer running too slow due to large number of applications which are installed.If you install  a specific software for each file format you will end up with a lot of bloatware.It is a pain for a lot of users to install different softwares for different file formats after installing a fresh
copy of their OS.You can save yourself from this trouble by installing a freeware application that is capable of opening multiple file formats (75+ formats).
It can give a breath of life to those systems which have low memory.Moreover it can be a lifesaver if you don’t have an idea about how to open a particular file extension, Just give it a try with Free Opener.

Supported File Formats

Code Files (.vb, .c, .cs, .java, .js, .php, .sql, .css, .aspx, .asp)
Web Pages (.htm, .html)
Photoshop Documents (.psd)
Images (.bmp, .gif, .jpg, .jpeg, .png, .tif, .tiff)
XML Files (.resx, .xml)
PowerPoint  Presentations (.ppt, .pptx, .pps)
Media (.avi, .flv, .mid, .mkv, .mp3, .mp4, .mpeg, .mpg, .mov, .wav, .wmv, .3gp, .flac)
Microsoft  Word Documents (.doc, .docx)
SRT Subtitles (.srt)
RAW Images (.arw, .cf2, .cr2, .crw, .dng, .erf, .mef, .mrw, .nef, .orf, .pef, .raf, .raw, .sr2, .x3f)
Icons (.ico)
Open XML Paper (.xps)
ML Paper (.xps)
Torrent (.torrent)
Flash Animation (.swf)
Archives (.7z, .gz, .jar, .rar, .tar, .tgz, .zip)
Rich Text Format (.rtf)
Text Files (.bat, .cfg, .ini, .log, .reg, .txt)
Apple Pages (.pages)
Microsoft Excel Documents (.xls, .xlsm, .xlsx)
Comma-Delimited (.csv)
Outlook Messages (.msg)
PDF Documents (.pdf)
vCard Files (.vcf)
EML Files (.eml)

Download Here:

◄◄READ MORE►►

How To Increase your internet speed (bandwidth) by 20%

1 comment Follow me on twitter

Windows holds back a large portion of your internet bandwidth as part of it's network settings. But if you're not on a corporate network, if this is your home computer, free that up for greater bandwidth. Get that extra speed by making a very quick, simple and easy change in the Windows Group Policy editor (works just like looking through your files and folders) as follows:
Click START, then click RUN.
Type "gpedit.msc" without the quotes, then click OK.
Browse to the highlighted area shown above -- the folder you want is Computer Configuration/ Administrative Templates/ Network/ QoS Packet Scheduler in the left-hand pane (shown above) then double-click "Limit reservable bandwith" in the right-hand pane. The dialog box shown below will pop up.


Click the dot (radio button) for Enabled as shown below, and in Bandwidth Limit, type or click up or down until a number between 0 and 10 is shown.

Click Apply, and click your way out of the open dialog boxes: you're done!

The lower the number you enter in Bandwidth Limit (where I have entered a "1" in the image below), the faster your internet connection will be. However, "5" is probably low enough, though you can play with this number:

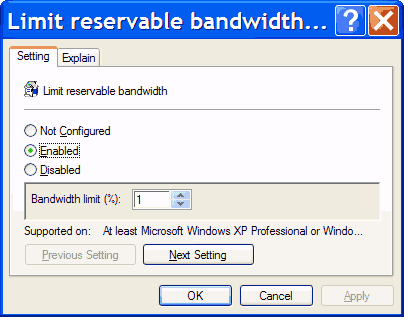
However, realize if the if the network card has a specific limit set on it in registry, this would have no impact on it.

That's All.!!
Enjoy..:)
◄◄READ MORE►►

How to Repair Your Windows XP Without Bootable CD

Leave a Comment Follow me on twitter

Many Times the registry entries or files of our system got corrupted because of viruses or other reasons in this case for repairing windows XP we format our system or repair windows xp by some other ways like by using Bootable Cd Method. But by this method we can repair our Windows xp without using Bootable CD or Formatting System.

This Method is called Web Folders XP Repairing System.

For Applying This Method..

Just Follow Below given Simple steps:

Step 1 – First Click on Start and go to Run.

Step 2 – In Run Type webfldrs.msi .


Step 3 – New window will open in your screen now Click on Select Reinstall Mode.


Step 4 – Again New Window will open in your screen just check marks on all the options and Click on OK .

 
Step 5 – It will take some time in Repairing your windows XP and when the process will be completed it will ask to Restart your System then just restart your system.
Thats It !

By Using this simple Method Your Windows XP will be repaired without using bootable CD or Formatting

That's All.!!

Enjoy
◄◄READ MORE►►

How To Get Android All Paid Apps For Free

Leave a Comment Follow me on twitter

From Android Black Market Alpha get all the Android paid Apps for Free .

Just Follow Below Given Steps :

Step 1 – First on your Android Device go to Preferred Browser.

Step 2 – In Search Box Type : Black Market Alpha 93 .

Step 3 – Click on the 4shared.com link .


Step 4 – Now find 49.93 Version and Download It .

Step 5 – While Downloading go to Settings >- Applications and make sure the box is checked for unknown resources if it’s not checked then click on it to to add the green checkmark to it .

Step 6 – Now Blackmarket Should stated downloading.

Step 7 – Now go to Notifications bar and pull down to get the tray and then click on the downloaded black market Alpha .

Note – Don’t Click on it unless the download has been completed.

Step 8 – Install and Open it.

Step 9 – Search all the paid apps in Black Market Alpha which you want and install paid apps for free

For Those Who Don't Want to Search For Black Market Alpha 93..Here is the Download Link For Them All..
http://www.mediafire.com/?j662udpd9q33nmx

 
That's All.!!
Enjoy
◄◄READ MORE►►

How To Get Someone’s IP Address Through Facebook

1 comment Follow me on twitter

Hello Friends ! Today i am going to post the trick for getting someone’s IP through Facebook.

Step 1 – First invite or ping that person for a chat on facebook .

Step 2 – Make sure your all other tabs in browser and other services in computer are closed. If Possible for you then delete all the cookies-cache and browsing history from your browser.

Step 3 – While chatting on Facebook go to Start >- Run >- cmd .

Step 4 – After Opening command Prompt Type netstat -an command and hit Enter.

Step 5 – Now you will get IP Address of all the established connections there .


Step 6 – Note all the suspicious IP’s and trace user using IP address tracer sites like whatismyip or ipmango.com .

You can use same trick for tracing IP of someone’s on Skype, gtalk and Yahoo Messenger..


That's All.!!
Enjoy
◄◄READ MORE►►

How To Update Facebook Status in Blue Text

Leave a Comment Follow me on twitter

Facebook magic trick was widely acknowledged by users and it went viral within few days..
Facebook Blue text status update is an extension of magic trick..

It uses the same concept of Profile ID’s.
However the only limitation of Blue colored status trick is that you status will be in the form of link and it will point to the the profile ID used in the status.
If you have changed your profile id into username then you can find it by clicking here.

Trick to Update Facebook Status in Blue Text:

►Login to your Facebook Account
►In the Status Update field copy/paste the following code
@@[0:[136269139737588:1: Your Text Here]]@[136269139737588:]

Replace Your Text Here with your status update text.


You Can Also Update Status in Blue Text Like Below:


@[1: ]@@[1:[0:1: Type Here]]

Now just click on Post button your status will be updated as clickable blue text..

That's All.!!
Enjoy!:)
◄◄READ MORE►►

How To Find the Profile ID In Facebook

Leave a Comment Follow me on twitter

Facebook Usernames have replaced the good old user ID’s as they were long and hard to remember..

But there are lot of applications and tricks like Magic Number and Blue coloured Facebook status trick which requires your Facebook ID.You can find the User ID of any page,Group or profile by using Facebook graphs..

How To Find the Profile ID In Facebook:


Finding the Profile ID of those users who haven’t changed their User ID number with the username.

Now just look at the URL in the address bar it will be something like this..
http://www.facebook.com/profile.php?id=123456789

Here 123456789 is profile ID.


For those who have Changed their User ID numbers with username, finding the Profile ID can be little bit tricky .
Now after the slash (/) add your username and hit Enter.
Now in the screen look for the “id” this will be your Facebook Profile ID.

That’s it! By this trick you can find Profile ID for your profile as well as for Pages.

Note: Remember the User ID number of pages is of 12 digits not of 15.


That's All.!!
Enjoy! :)

◄◄READ MORE►►

How to Send Colorful Text in Facebook Chat

Leave a Comment Follow me on twitter

Facebook has restricted its user to chat in black text due concerns of server overloading and speed..
But now you are no longer bound to chat in black text..
There are some special codes for you that empower you to send colourful text in chat..

This trick is solely based on the fact that when profile ID’s are inserted in between square brackets, it automatically transforms into the profile picture. These ID’s are specially created for this purpose.

You can also send messages in colourful text but these codes will not work in Status update..

This will also not work if the other person is using chat from his mobile..


How to Send Colourful Text in Facebook Chat:

Here is the list of codes with their alphabets.


[[107015582669715]] = A

[[116067591741123]] = B

[[115602405121532]] = C

[[112542438763744]] = D

[[115430438474268]] = E

[[109225112442557]] = F

[[111532845537326]] = G

[[111356865552629]] = H

[[109294689102123]] = I

[[126362660720793]] = J

[[116651741681944]] = K

[[115807951764667]] = L

[[106596672714242]] = M

[[108634132504932]] = N

[[116564658357124]] = O

[[111669128857397]] = P

[[107061805996548]] = Q

[[106699962703083]] = R

[[115927268419031]] = S

[[112669162092780]] = T

[[108983579135532]] = U

[[107023745999320]] = V

[[106678406038354]] = W

[[116740548336581]] = X

[[112416755444217]] = Y

[[165724910215]] = Z


To create a word of colourful text copy the codes of alphabets and make sure to insert single space between the each alphabetic code. Here is the code for SOFTRICKZS.


SOFTRICKZS: [[115927268419031]] [[116564658357124]] [[109225112442557]] [[112669162092780]] [[106699962703083]] [[109294689102123]] [[115602405121532]] [[116651741681944]] [[165724910215]] [[115927268419031]]

That's All.!!
Enjoy..:)
◄◄READ MORE►►

How to install turbo C Compiler

Leave a Comment Follow me on twitter


Turbo C was an Integrated Development Environment and compiler for the C programming language from Borland. It was first introduced in 1987 and was noted for its integrated development environment, small size, extremely fast compile speed and comprehensive manuals.

In May 1990, Borland replaced Turbo C with Turbo C++.

Here we going to talk about Turbo C++ 3.0 version. it is best of all version and widely used by students.
Turbo C++ 3.0 was released in 1991. Initially released as an MS-DOS compiler, 3.0 supported C++ templates, Borland’s inline assembler, and generation of MS-DOS mode.

If you know How to Install Turbo C Compiler..It will Help you to Install Turbo C/C++..
So Lets See How to Install Turbo C Compiler..!!


To install Turbo C compiler :

1. First you need to download the compiler.

2. After finished download unzip the turbo c to folder & open the folder.
Note: For the time of installation the folder should be present anywhere in Drive C.. like desktop, documents, downloads..

3. Run install.exe and press ENTER to continue.


4.Enter the SOURCE drive to use: C


5. Enter the SOURCE Path: source path is where you extracted the turbo c.zip file we don’t need to give the source it will find and take automatically. you just press ENTER at this step.


6. Then scroll down by arrow key and Start Installation.


Now you have successfully installed turbo c compiler.

Now to open the turbo c compiler 
Go to Drive C > TC > Bin > TC .exe


You can have shortcut on desktop so that no need to follow long path to open TC.

Just open TC folder in drive C select TC.exe and right click on it, Click on send to> Desktop (create shortcut).

That's All..!!
Enjoy.. :)

◄◄READ MORE►►

How to Create your own Images as Emoticons for Facebook Chat

Leave a Comment Follow me on twitter
Today I'm going to teach you How images can be send in Facebook Chat created using a simple online website called “Smileyti.me”. 
It’s a simple image uploading and emoticon conversion website which will simply create some different codes for your images when they are complied together you get your image drawn right in front of your eyes.

So now we have a created a Gif image for helping you out in uploading your image and using that website below so now just follow below steps and have fun creating your own funny images.


Create your own Image Emoticons using Smileyti.me :


  • Now After you Upload your Image you will get your code like below.

         
  • Now that’s your final code, just copy this code and paste it in your Facebook chat and you will see your image rendering simply perfect.

Have fun and I hope you enjoyed this amazing article by us..:)
Enjoy..:)

◄◄READ MORE►►

How To Chat With Command Prompt

Leave a Comment Follow me on twitter

If you are a pc user on a network you can set up a private chat directly through your Command Prompt. All that’s needed is the IP address for the users system in which you wish to communicate. This IP address can also be found in the Command Prompt. To find a computers IP address go to your Command Prompt and type ipconfig. This will reveal your IP address, Subnet Mask & Default Gateway. Copy the IP address of the computer in which you are sending a message to.  

That means If you want personal chat with a friend
you don't need to download any yahoo messenger
All you need is your friends IP address and Command Prompt.

1. Firstly, open Notepad and enter:

@echo off
:A
Cls
echo MESSENGER
set /p n=User:
set /p m=Message:
net send %n% %m%
Pause
Go to A


2. Now save this as "Messenger.bat". Open that .bat file and in Command Prompt you should see:

MESSENGER
User:


3. After "User" type the IP address of the computer you want to contact.


4. After this, you should see this:

Message:

Now type in the message you wish to send.Before you press "Enter" it should look like this:

MESSENGER
User:27.196.391.193
 Message: Hi

Now all you need to do is press "Enter", and start chatting!


That's All.!!
Enjoy It! :)
◄◄READ MORE►►

How to Change Windows XP Logon Screen background

Leave a Comment Follow me on twitter


You can put your favorite image or picture in the background of the logon screen by doing the following methods:


  • Click the Start button and select “Run”
  • In the “open” field, type "Regedit"(withou Quotes) and click OK
  • In the registry editor, navigate to HKEY_USERS\.DEFAULT\CONTROL PANEL\DESKTOP and double-click the string “wallpaper”
  • Enter the full path and filename of the .bmp image that you want to use as background (the image must be in .bmp format)
Click “OK” and close the registry editor ..

Note: Should Restart the computer for changes.


If you want to see the background set in tiled effect with the bitmap then follow the below steps:


  • Click the Start button and select “Run”
  • In the “open” field, type regedit and click ok
  • change the string HKEY_USERS\.DEFAULT\CONTROL PANEL\DESKTOP\TILEWALLPAPER to “1″ instead of “0″
Click “OK” and close the registry editor..

That's All..!!
Enjoy..:)
◄◄READ MORE►►
Premium WordPress Themes